I've been thinking recently about what kind of projects I want to do when the weather gets to warm to really brew beer well.
Greg sent me a couple of emails with a idea and I think this just may be what I do.
http://www.oregonbrewcrew.com/freezer/freezer.html
As I look around the internet there are a few more like this one, but the basic concept is the same.
The freezer I have hooked up is only 7C.F. so that I means I will probally forgo the fermentation chamber. I should be able to fit 3 Corny kegs in my freezer if I put the CO2 on the outside.
Of course if I do it right I could also put half and pony kegs in there.... mmmmm Fat Tire on tap.
OK bad thoughts... this could be deadly.
Stay tuned this could be fun.
Wednesday, March 19, 2008
Saturday, February 02, 2008
Carbination baby.... it's what makes beer go fizz
So with the latest batch of beer I have run into a unexpected problem.... To much carbination! So much in fact that when I pull a glass I have a glass full of foam rather then a glass full of mostly beer and some foam.
It's a disturbing situation to say the least.
How does one remove over carb from a keg of beer? I haven't quite gotten that one figured out yet. Right now I'm trying the remove the CO2 tank from the keg and releasing the pressure method. I'm going to give it a few days and see what I come up with.
I did have a similar problem with the last batch, but it was resolved by simply dialing back the pressure on the keg. This time that is not working nor is the cold glass trick. I'm not espcially worried about it since I'm not above dumping home brew and starting over.
Which I'm seriously starting to think about.
Though on the bright side Curtis did declare the beer "passable" which I think means if it's the only thing to drink in the house I won't bitch. John also declared "if this was cold it would be perfect"
At least I know people like my kit home brew... just wait until I start screwing with them when I do my own recipies :)
Wednesday, January 23, 2008
Third Review... Shiner Bock Brown Ale
Shiner Brewery in Shiner Texas makes a full range of Ales (at least that is what they say on their website, www.shiner.com).  Shiner Bock is one of the few brews that comes out of the third greatest state in the union (the first two being Arizona and Colorado) that is generally avalible here in Phoenix.
In general Shiner Bock is about how you would expect a Brown Ale to be. Full of flavor but not to much bite. It's got a bit of sweetness to it, not like a fat tire but more subtle. It also has a hint of a smokey flavor like a porter again is very subtle to find it. Overall all a way above average beer that has come from much farther away then fat tire or the flying dog (~800 --> 900 miles to the Denver Ft Collins are as opposed to ~1100 miles for Shiner TX Ok it's not that big of a diffrence but you get the idea)
Shiner loses points for having a twist off top.. I know it's from Texas and all but come on even a good Texan in a dry county has to have access to a bottle opener (the whole dry county concept is the only reason I can come up with as to why a micro brew would even consider such a device acceptable). Also shave off a few more points for the beer being better out of a bottle then a glass, at the very minimum it should be equally good out of both if not better in a glass.
A good beer, just not the first one I would reach for.
 Shiner Bock is one of the few brews that comes out of the third greatest state in the union (the first two being Arizona and Colorado) that is generally avalible here in Phoenix.
 In general Shiner Bock is about how you would expect a Brown Ale to be. Full of flavor but not to much bite. It's got a bit of sweetness to it, not like a fat tire but more subtle. It also has a hint of a smokey flavor like a porter again is very subtle to find it. Overall all a way above average beer that has come from much farther away then fat tire or the flying dog (~800 --> 900 miles to the Denver Ft Collins are as opposed to ~1100 miles for Shiner TX Ok it's not that big of a diffrence but you get the idea)
Shiner loses points for having a twist off top.. I know it's from Texas and all but come on even a good Texan in a dry county has to have access to a bottle opener (the whole dry county concept is the only reason I can come up with as to why a micro brew would even consider such a device acceptable). Also shave off a few more points for the beer being better out of a bottle then a glass, at the very minimum it should be equally good out of both if not better in a glass.
A good beer, just not the first one I would reach for.
Tuesday, January 08, 2008
Ok lets talk about cleaning....
So if you've done any reading at all on the whole home brew process you have surely run across more then a chapter or fifty about how important it is to clean and sanitize your equipment.
The good news, it's easy to do and doesn't require alot of heavy elbow work, the bad news. You have the most ungainly group of items ever devised by man to clean. Did I mention the nooks and crannies? No? Oh you have nooks and crannies too.
Case in point #1 the Keg... because bottling is so much worse then kegging. Now for those of you keeping score at home this is the same keg that I kept batch #1 in and the keg I planned on putting batch #2 in.
 The stuff in the bottom? The normal sediment you get with home brewing since your not filitering your beer like the micro/macro brews you get this lovely sludge in the bottom. The good news it's mostly beer (barely) and fine particulate matter so it's easy to rinse out. The bad news... remember the bit about the nooks and crannies? Now look down on the bottom of the picture... see the tube thats where the beer comes out of the keg... You need to clean that too.
I can already hear you crying with joy now.
 It's not as bad as you think... the thing actually screws out first off and then you can get a special brush to clean the inside. If you goto morebeer.com it's called a line brush if you talk to the guys at homebrewdepot here in Mesa it's a "dip tube brush".
  So cleaning the keg isn't that bad at all and once you've got it disassembled it's really easy to clean. I think I may get a toliet brush (a new one you sicko) to clean the keg after the next batch clears out. Since all I really did this time was rinse it with water and gave the keg a once over with my carboy brush.
I am probably going to look for a deep socket set since the connectors on the top of the keg are hexagonal in shape and a socket wrench will fit around them. Lets just say it's a little unnerving pressurizing your tank to 25psi after hand tightening everything.
Of course if things had gone south on me I would have the start of a very nice sky light in my kitchen.
The good news, it's easy to do and doesn't require alot of heavy elbow work, the bad news. You have the most ungainly group of items ever devised by man to clean. Did I mention the nooks and crannies? No? Oh you have nooks and crannies too.
Case in point #1 the Keg... because bottling is so much worse then kegging. Now for those of you keeping score at home this is the same keg that I kept batch #1 in and the keg I planned on putting batch #2 in.
 The stuff in the bottom? The normal sediment you get with home brewing since your not filitering your beer like the micro/macro brews you get this lovely sludge in the bottom. The good news it's mostly beer (barely) and fine particulate matter so it's easy to rinse out. The bad news... remember the bit about the nooks and crannies? Now look down on the bottom of the picture... see the tube thats where the beer comes out of the keg... You need to clean that too.
I can already hear you crying with joy now.
 It's not as bad as you think... the thing actually screws out first off and then you can get a special brush to clean the inside. If you goto morebeer.com it's called a line brush if you talk to the guys at homebrewdepot here in Mesa it's a "dip tube brush".
  So cleaning the keg isn't that bad at all and once you've got it disassembled it's really easy to clean. I think I may get a toliet brush (a new one you sicko) to clean the keg after the next batch clears out. Since all I really did this time was rinse it with water and gave the keg a once over with my carboy brush.
 I am probably going to look for a deep socket set since the connectors on the top of the keg are hexagonal in shape and a socket wrench will fit around them. Lets just say it's a little unnerving pressurizing your tank to 25psi after hand tightening everything.
Of course if things had gone south on me I would have the start of a very nice sky light in my kitchen.
Monday, January 07, 2008
Batch #2 and other thoughts....
I kegged Batch #2 this evening... I don't know how the fermentation took... there was about .25 of a inch of yeast on the bottom of the carboy.... I don't know if this is because of the yeast I used or the beer. The last batch had almost 2 inches of yeast.
I also planned on posting more photos and cleaning guide.. I think that is going to wait until tommrow night.
I also planned on posting more photos and cleaning guide.. I think that is going to wait until tommrow night.
Monday, December 31, 2007
Batch #2 - A fine Scotch Ale
OK so I wandered down to the homebrew store down the street and picked up another kit... this time it's a scotch ale. This should be intersting since the closesest thing I've ever had to a scotch ale is a irish ale.
And in a very uncharacteristic turn I am almost totally ignoring the instructions that came with said kit and doing the entire thing as I've been taught... it's either going to be a mess or it's going to be ok.
And I just realized that I'm supposed to let the water get to 180 before I put the grains in... Oh well
Wednesday, December 05, 2007
Can't drill the bottom...
OK so I planned on this post being all about how I got a freezer hooked up a thermo regulator, drilled a few holes and bam! Had a insta kegarator, well my plans got foiled in a few resepects.
I had planned on going through the compressor compartment... which was to tight for a drill bit and I couldn't gurantee that I wouldn't hit the compressor and not break something when I broke through. And on top of that how do you explain to lowes the 4 or 5 holes in a freezer when you bring it back?
Exactly....
So for the time being in true do it yourself fashion, I've duct taped the thermo lead to the inside of the freezer and put the CO2 tank and keg in there.
When I actually get around to doing holes I will take pictures...
Saturday, December 01, 2007
Results of Batch #1 of Obispo Brewery...
Kegging is done and the beer has been under CO2 pressure for 4 days. While it still needs to be under pressure for another 7 days before it's really done the beer is finally at a point that it's either going to be good or it's not.
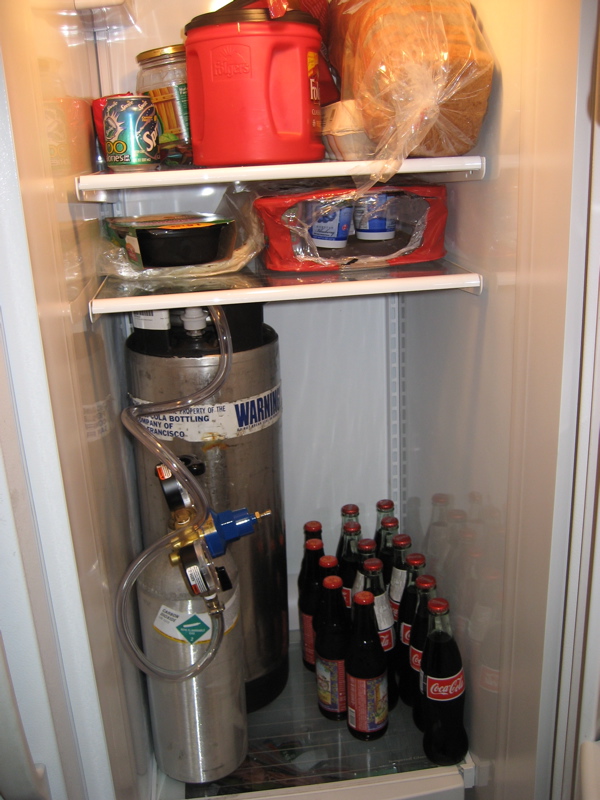
But before we get to that point I wanted to talk briefly about kegging. The soda keg for the beer is one of the better decisions I made for this entire process. Aside from not having to screw with 48 some odd bottles and caps I also don't have to screw with a secondary fermentation vessel or additional adjuncts to my beer. As you can see in my picture I'm currently keeping my whole keg setup in a fridge.... this is a less then ideal setup since I lose my fridge for storing food (kind of a issue for me) and the cold humidity is screwing with the regulator... That part is what is causing more pain and misery then anything else right now. So for the weekend I will keep the beer in the fridge but will be purchasing a small freezer and doing some work on it to make it more suitable for beer kegs. More on that once I actually do it.

Now for the part that you have been waiting for... Results of the first beer tasting.
IT'S GOOD!!
The biggest concerns were spoilage because I for got to clean something or something was not quite right.... I'm happy to say that I had no problems in that department and have good beer!
Overall the beer is defintly a ale, a touch hoppier then what I'm used to in Ales, but no where near the level of a traditional IPA. The alcohol content is also a bit on the heavy side as I had a single 16oz serving and was feeling a little to good. A empty stomach may also have had something to do with that. Overall I'm very pleased with the results of this first batch.
In the next series of entries I show I get my fridge back and begin prep for my next batch.
Until next time kiddies.
Sunday, November 18, 2007
Obispo Brewery batch #1
First brew is in the Carboy and fermenting... turns out on my dry run I had closer to 4 gallons of water and not the 5 I had estimated to begin with.
All told it was 3.5 hours to from start to finish (finish being the carboy in a water bath).
At this point the only thing I'm worried about is the carboy water bath. The bath has been holding steady at ~78F unless I add ice to the bath then it drops to ~70F which is good. This particular ale doesn't like to ferment above 80F. The plan for the moment is to let the wort/beer ferment until Monday night and then transfer to a keg. I don't need to do a secondary fermentation since I'm going to be using a keg to infuse the CO2, however I still do question that particular move.
More on the kegging and CO2 process when I actually do it. Which reminds me I need to find a industrial gas supply company and get my CO2 tank either filled or swapped.
Pictures are up on Flickr... blogspot is to much of a pain in the ass to load pictures.
Saturday, November 03, 2007
A "Dry" run...
Doing a first "dry" run on the beer kit.... making sure that I have all the stuff that I need logistics that kind of thing.
Things to note...
Propane burners are loud and hot... should probally brew on back porch when time comes not garage unless it is a windy day.
20 minutes to bring ~8 gallons of water to 200F so around 15minutes for 6 gallons to 180F
Propane control knob has a small play region after 2 turns it's wide open.
Need to find a better thermometer... this one floating way low in the pot is not a good idea.
Oven mits are a really good idea all around
Ball valve on the pot is holding... small leakage only from the end.
Sink, test, and tighten chiller before starting boil...
7 minutes to 150F with 8 gallons of water.
May need to spray out side of kettle to help get water temp down. Need to get second hose.
Subscribe to:
Posts (Atom)